1. Blink
This example is like the "Hello World" of physical computing:
 Get the code
3. Other buzzer examples
The following programs (also deployed with the current Minibloq's version) works with the same circuit as the "ramdom notes" example. You can open them with the File->Examples menu:
4. Servo (incremental position)
 Get the code
The code for this example is included with Minibloq's current distribution (v0.82.Beta). You can find the code easily:
Get the Fritzing circuit
The Fritzing circuit for this example is included in the doc subdirectory on the example's folder.
Parts list
See it in action
 Get the code
 Get the code
Get the code
This example is like the "Hello World" of physical computing:

The code for this example is included with Minibloq's current distribution (v0.82.Beta). You can find the code easily:
See it in action
2. Buzzer (random notes)
 Get the code
- Click on the the File->Examples menu.
- In the open file dialog, go to the folder DuinoBot\0.Blink
- Open Blink.mbqc
See it in action
2. Buzzer (random notes)

The code for this example is included with Minibloq's current distribution (v0.82.Beta). You can find the code easily:
Fritzing circuit included
The Fritzing circuit for this example is included in the doc subdirectory on the example's folder.
Parts list
See it in action
- Click on the the File->Examples menu
- In the open file dialog, go to the folder DuinoBot\230.RandomNumberBuzzer
- Open RandomNumberBuzzer.mbqc
The Fritzing circuit for this example is included in the doc subdirectory on the example's folder.
Parts list
- 1x 5 to 9V (small) buzzer without oscillator.
- 1x Breadboard.
- 1x Arduino™ compatible board.
- Cables.
These parts can also be found in kits like the SparkFun Inventor's Kit for Arduino.
3. Other buzzer examples
The following programs (also deployed with the current Minibloq's version) works with the same circuit as the "ramdom notes" example. You can open them with the File->Examples menu:
- DuinoBot\60.RepeatBuzzerBeep\RepeatBuzzerBeep.mbqc
- DuinoBot\70.BuzzerAndVariable\BuzzerAndVariable.mbqc
4. Servo (incremental position)

The code for this example is included with Minibloq's current distribution (v0.82.Beta). You can find the code easily:
- Click on the the File->Examples menu
- In the open file dialog, go to the folder DuinoBot\300.ServoIncrementalPos
- Open ServoIncrementalPos.mbqc
The Fritzing circuit for this example is included in the doc subdirectory on the example's folder.
Parts list
- 1x standard servo (like this, for example).
- 1x Breadboard.
- 1x Arduino™ compatible board.
- Cables.
These parts can also be found in kits like the SparkFun Inventor's Kit for Arduino.
5. Five LEDs

The code for this example is included with Minibloq's current distribution (v0.82.Beta). You can find the code easily:
Get the Fritzing circuit
The Fritzing circuit for this example is included in the doc subdirectory on the example's folder.
Parts list
See it in action
6. Analog sensor and blinking- Click on the the File->Examples menu
- In the open file dialog, go to the folder DuinoBot\310.FiveLEDs
- Open FiveLEDs.mbqc
The Fritzing circuit for this example is included in the doc subdirectory on the example's folder.
Parts list
- 2x standard 5mm red LEDs (other colours can be used).
- 3x standard 5mm yellow LEDs (other colours can be used).
- 5x 330 Ohms 1/8W resistors.
- 1x Breadboard.
- 1x Arduino™ compatible board.
- Cables.
These parts can also be found in kits like the SparkFun Inventor's Kit for Arduino.

To get the code you will need to:
The Fritzing circuit for this example is included in the doc subdirectory on the example's folder.
Parts list
See it in action
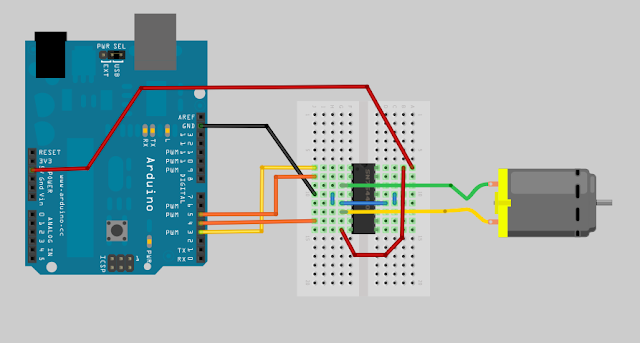
7. DC motor with H-bridge examples
- Click on the the File->Examples menu
- In the open file dialog, go to the folder DuinoBot\360.AnalogSensorAndBlinking
- Open AnalogSensorAndBlinking.mbqc
Please note that this circuit and code can be also be used for the AnalogSensorAndFading example, deployed with Minibloq:
Get the Fritzing circuit- Click on the the File->Examples menu
- In the open file dialog, go to the folder Arduino\10.AnalogSensorAndFading
- Open AnalogSensorAndFading.mbqc
The Fritzing circuit for this example is included in the doc subdirectory on the example's folder.
Parts list
- 1x Flex sensor like this (PDF datasheet).
- 1x 10K 1/8W resistors.
- 1x 330 Ohms 1/8W resistors.
- 1x Breadboard.
- 1x Arduino™ compatible board.
- Cables.
These parts can also be found in kits like the SparkFun Inventor's Kit for Arduino.
7. DC motor with H-bridge examples

The following examples are deployed with Minibloq's current distribution (v0.82 Beta). You can open them with the File->Examples menu:
The Fritzing circuit for this example is included in the doc subdirectory on the example's folder.
Parts list
 Get the code
9. IR remote control + DuinoBot.Kids
Get the code
9. IR remote control + DuinoBot.Kids
 Get the code
 Get the code
- DuinoBot\90.RepeatMotorsFwdRev
- mobileRobot\100.MotorAcceleration
The Fritzing circuit for this example is included in the doc subdirectory on the example's folder.
Parts list
- 1x small DC motor like this (be careful: don't use motors bigger than those that can be managed by your H-bridge IC and your control board.)
- 1x H-bridge IC like the L293D or the SN754410 (Note: If you use the SN754410 you may need to add fast clamping diodes, such as the UF4007 -the L293D already have internal clamping diodes-.)
- 1x Breadboard.
- 1x Arduino™ compatible board.
- Cables.
These parts can also be found in kits like the SparkFun Inventor's Kit for Arduino.
See it in action
8. DC motor, H-bridge and sensor

This example's code is very simple, and is deployed with Minibloq's current distribution (v0.82.Beta). You can open it with the File->Examples menu:
The Fritzing circuit for this example is included in the doc subdirectory on the example's folder.
Parts list
- DuinoBot\120.AnalogSensorAndMotor
The Fritzing circuit for this example is included in the doc subdirectory on the example's folder.
Parts list
- 1x small DC motor like this (be careful: don't use motors bigger than those that can be managed by your H-bridge IC and your control board.)
- 1x H-bridge IC like the L293D or the SN754410 (Note: If you use the SN754410 you may need to add fast clamping diodes, such as the UF4007 -the L293D already have internal clamping diodes-.)
- Trimpot 10K with Knob, like this.
- 1x Breadboard.
- 1x Arduino™ compatible board.
- Cables.
These parts can also be found in kits like the SparkFun Inventor's Kit for Arduino (except for the H-bridge).
See it in action

The code for this example is included with Minibloq's current distribution (v0.82.Beta). You can find the code easily:
Parts list
See it in action
10. IR controlled N6 robot- Click on the the File->Examples menu
- In the open file dialog, go to the folder DuinoBot\130.IRBuzzer
- Open IRBuzzer.mbqc
- 1x RobotGroup's DuinoBot.Kids board.
- 1x RobotGroup's Multiplo 38 KHz IR sensor.
- 1x Multiplo sensor cable
- 1x RC5 standard remote control, like this.

The code for this example is included with Minibloq's current distribution (v0.82.Beta). You can find the code easily:
Parts list
See it in action
 Get the code
See it in action
- Click on the the File->Examples menu
- In the open file dialog, go to the folder mobileRobot\50.IRRemoteRobot
- Open IRRemoteRobot.mbqc
- 1x RobotGroup's N6 robot (you can use other robots, but you will need to adapt the code).
- 1x RobotGroup's Multiplo 38 KHz IR sensor.
- 1x Multiplo sensor cable
- 1x RC5 standard remote control.
11. Selecting blocks in a Multiplo conveyor belt

To get the code you will need to:
Parts list
This example can be built with a construction kit, such as the Multiplo TechBox from RobotGroup.
- Click on the the File->Examples menu
- In the open file dialog, go to the folder DuinoBot\290.ConveyorBelt
- Open ConveyorBelt.mbqc
Parts list
This example can be built with a construction kit, such as the Multiplo TechBox from RobotGroup.
See it in action